Create your own Minecraft mod. How mods are created
The popularity of Minecraft is only growing every year, partly the players themselves contribute to this, developing mods and adding new texture packs. Even an inexperienced user will be able to create his own modification if he uses special programs. In this article, we have selected for you some of the most suitable representatives of such software.
First, consider the most popular program for creating mods and textures. The interface is made very convenient, each function is in the corresponding tab and has its own editor with a set of specific tools. In addition, connection of additional software is available, which will need to be downloaded in advance.

As for the functionality, here MCreator has both advantages and disadvantages. On the one hand, there is a basic set of tools, several operating modes, and on the other, a user can configure only a few parameters without creating anything new. To globally change the game, you need to refer to the source code and change it in the appropriate editor, but this requires special knowledge.
Linkseyi`s Mod Maker
Linkseyi`s Mod Maker is a less popular program, but it provides users with significantly more features than the previous representative. Work in this software is implemented in such a way that you need to select certain parameters from pop-up menus and upload your own images - this makes the program only more convenient and simpler.

You can create a new character, mob, material, block, and even a biome. All this is combined into one mod, after which it is loaded into the game itself. In addition, there is a built-in model editor. Linkseyi`s Mod Maker is free and available for download on the official website of developers. Please note that there is no Russian language in the settings, but even without knowledge of English, mastering Mod Maker will be very simple.
Deathly`s Mod Editor
Deathly`s Mod Editor in its functionality is very similar to the previous representative. There are also several tabs in which a character, tool, block, mob or biome is created. The mod itself is formed into a separate folder with component directories, which you can observe on the left in the main window.

One of the main advantages of this program is a convenient system for adding texture images. You do not need to draw a model in 3D mode, you only need to load images of a certain size in the corresponding lines. In addition, there is a built-in modification testing function that allows you to detect those errors that could not be detected manually.
There weren’t a lot of programs on the list, however, the representatives present were perfectly able to cope with their tasks, provide the user with everything they need during the creation of their mod for Minecraft.
Custom modification of computer games is a fairly common phenomenon, which is a change and addition of game files to get more content, a variety of gameplay, and so on. Sometimes mods can be small, adding only a couple of items or functions. And sometimes you can find global mods that almost completely change the gameplay. For Minecraft, one of the most popular computer games of our time, gamers make quite a lot of different mods. Therefore, you can learn how to create a mod for Minecraft - in fact, it is easier than it sounds, but in any case it will take you quite a lot of time.
Mods for Minecraft
So, if you seriously decided to figure out how to create a mod for Minecraft, then you need to understand what exactly can be modified there. In fact, there are an incredible amount of opportunities - there are much more mods to this game than to everyone else. This is due to the fact that Minecraft looks quite simple - respectively, and changing something in it or adding certain functions to it is easier than in a high-end project that hundreds of professionals have been working on for several years. Now there are already such mods as Industrial Craft or Taumcraft, which can be safely attributed to global ones, since they add incredibly a lot of content to the game - the first transfers Minecraft to the industrial era, adding hundreds of new recipes and items. The second one adds magic to the game and everything attached to it. Naturally, you should start with simpler projects, but in the end, you can also create something serious. But first, you need to learn how to create a mod for Minecraft.
Creating a pure mod

If you want to learn about how to create a mod for Minecraft, then you need to immediately understand that it can be done by two completely different methods - using the API or without. First you need to parse the creation of a clean mod that does not require additional software. In this case, you need to be well versed in the mechanics of the game and have certain design skills, as well as the ability to program at a high level. Then you can introduce something new into the game, as well as change certain objects, functions and much more. As a result, you can create a unique and unusual mod, but it is likely that it will be limited to use by other gamers, as it will not be standardized - accordingly, one of the gamers may have a problem with launch and compatibility, regardless of whether what mode was created this modification "Minecraft" - survival or creativity.
Creating Mods Using the API

API is a special programming interface that already contains a lot of functions from the game itself, as well as textures, skins, and much more. Thus, instead of writing all the code from scratch, you can use ready-made solutions that can be combined with each other, creating something new. There are a large number of different interfaces, and choosing among them something specific can be a problem. Here you need to take into account the specifics of the mod, for example, in relation to the Minecraft mode - survival, hardcore, creative and so on. But if you are just starting to make mods, and also want your modification to be available to the maximum number of people, then you need to use Minecraft Forge. This is the most common API that currently exists - at the same time, it is the most functional, voluminous and in demand. Therefore, if you are going to add new mods to Minecraft - pay attention first of all to it.
Features of using Minecraft Forge

Many gamers who create or use mods wonder why Forge is needed at all. After all, this is so inconvenient - you definitely need to install the API itself in order to be able to then start the modification. Is it really impossible to make pure mods that do not require anything extra for the game? In fact, "Forge" has much more advantages than disadvantages (by the way, there is only one, which consists precisely in the need to preinstall the API to run the mod). Firstly, the process of creating a mod is simplified, and secondly, you have much more opportunities for which you do not need to make efforts. But most importantly - your mod becomes universal. If you make a modification without an API, as mentioned above, it is likely that many gamers will not be able to install it. If you used Forge, then any gamer with the installed API can install your mod without any problems.
Features of use
The most important modification rule, no matter which option you choose, is to not modify the source files. For example, you decided to make mods for Minecraft for cars - it’s better to add new objects, rather than correct those that are in the game to avoid conflicts.
Button Create a Mod automates the process of creating a Source mod. She:
- Creates a new mod along this path steamapps \\ SourceMods \\
- Makes a copy of the source files in Visual Studio Project format for later editing
- Creates a configuration file for your mod
Note:You must restart the STEAM client for your mod to appear in the library.
Engine versions
Before creating a mod, you must select the version of the engine that you will use. Change the SDK version to the one you want to use.
Outdated - Initial version of Half Life 2: Episode One. Left for backward compatibility only. The original version of the Orange Box. This is the latest HL2-based version of the engine that is available to create the mod. This is exactly the version on which most mods are made. Updated Orange Box version. This is the current version of the engine with Mac support. However you You will NOT be able to create a full mod at Source 2009; only content-only mod (including new weapons / textures, etc.) using manual creation using this tooltip. Alien Swarm (via Alien Swarm SDK) To create a mod for this game, use its SDK. It is also possible to use HL2 content. In the 2013 version, Valve stopped supporting source codes through the Source SDK with the release of SteamPipe. In connection with these changes, source codes based on the HL2 branch of the Source Engine have been updated to the latest versions. This time, the source code is not made available through the Launcher SDK, but instead is hosted on Github. See for details.A warning:Your Engine Version in should match the version in fashion! Otherwise, there will be problems with the discovery of resources and content.
Creation Wizard
Type of project
This section is only for Half-Life 2 mods!When you start the wizard, you will have the opportunity to choose what you want to do.

Half-Life 2 Single Player Projects for Episode One (2006) or Two (2007). If you do not have Ep1 / 2, this option will not be available. Half-Life 2 Multiplayer Projects for Half-Life 2: Deathmatch. This option is only available if you have Half-Life 2: Deathmatch; Multiplayer mod from template This project allows you to configure parameters such as command mode or custom modifications. This option not requires Half-Life 2: Deathmatch. Source code only Dump code without the need to create a mod. This option is convenient if you just want to create a server plugin.
Whichever option you choose, you will receive source code files (even if you did not own one or another game). You also get "all" available programs, which includes a set of development tools.
Fashion Information
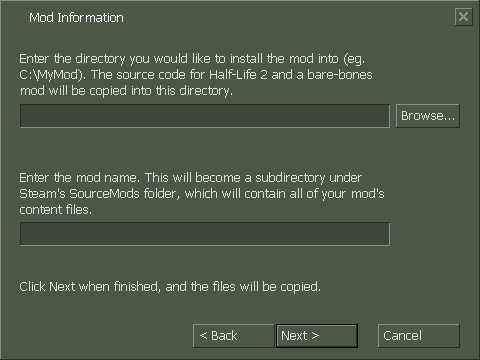
In this window, you will be prompted to specify the directory into which the files will be unpacked and indicate the name of the mod. The first field indicates the path where all the source files that you will use when creating the modification are unpacked. It can be anything, but make it simple, for example, "C: \\ mymod-source". In the second field, enter the name of your mod. Click Next when you are ready.
Manual creation of a mod
It is really very simple:
- Create a folder on this path steamapps \\ SourceMods \\ (The mod can be located anywhere, but only in this folder STEAM can detect and connect it.)
- Create gameinfo.txt: ru in this folder. Now you have a mod! :)
- Open the SDK launcher and switch to the desired version of the engine.
- Select "Edit Game Configurations" and click "Add." Enter the name of the mod and the folder with it.
To get the source code (or other files that you want to modify), you must use GCFScape and access sourcesdk.gcf \\ src_mod \\. Do not forget to save the changed files in the folder of your mod.
Hello dear friends! With this article, I am starting to write Minecraft modding material. Of course, you can’t wait to start working on some epic and original mod, but you don’t need to rush. Before you begin, you will have to install the necessary software.
What do we need:
- Java JDK
- MinecraftCoderPack
- Minecraft
- Modloder
- NotePad ++
- Eclipse
* Do not worry, even if the list consists of as many as 6 points, in fact, everything is much simpler than it seems.
First you need to install Java and clean Minecraft (preferably licensed), of course you already have it, but still ... To avoid errors or, if any, refer to the video tutorial “Installing Java JDK”, which is available at the bottom of the page. There you can find a video on installing Minecraft Coder Pack (MCP).
Install MCP
Today, the current version is MCP 7.23. This version is suitable for game 1.4.5
Download, unpack to any folder ( example: “mcp” folder on the desktop).
We need pure Minecraft 1.4.5. To do this, run the game and click “Force update”.
We go along the path: “C: \\ Documents and Settings \\ YourUser \\ Application Data \\ .minecraft”
* You can go this way by pressing Win + R, and then typing in the field:% appdata%
Download ModLoader latest version (1.4.5) and install it. Installation lesson ‘and you can always find it without my help, I hope you can do it.
Just in case, create a backup minecraft.jar.
Copy folders bin and resources to the “jars” folder of our mcp.
We launch decompile.bat, upon completion, press any key. If during decompilation the computer gave you a couple of errors, then you should not worry about this.
Install Eclipse
Where will we work with the code, create and edit our mods? Of course in the Java editor! I prefer Eclipse, but you can also use NetBeans. Honestly, almost any text editor is suitable, but it’s more convenient to work in special programs.
Installing this software is quite simple. Now run and specify the path:
“C: \\ Documents and Settings \\ User \\ Desktop \\ mcp \\ eclipse”
NotePad ++ editor is also useful for you. With his help, you can also edit the necessary files, and they act very quickly and conveniently.
* Attention do not forget to copy exactly 2 folders ( bin and resources) This is not mentioned in the video!
Video
I also advise you to familiarize yourself with the Quick installation of Minecraft Coder Pack. You only need to repeat all the actions for me.
Minecraft is still one of the most popular games in the world, the excitement around it does not subside, and this is largely due to the fact that the game has an open source code. What does this mean? This means that everyone can take the game code and improve it as he wants, thereby making his own mod. How to make a mod on Minecraft? This is not so simple, and that is why this article is useful to you. In it you will find all the necessary information regarding how the process of creating modifications for this game looks like. Naturally, this is not a complete guide on how to make a mod for Minecraft. To figure this out, you'll have to read entire books and manuals. This is a brief introduction to the world of modifications for this game, which will help you decide in which direction you want to move.
Where to start?
If you are wondering how to make a Minecraft mod, then you should start by determining your skill level. Firstly, you need to know the basic concepts of programming in general, and secondly, you need to know the Java programming language at least at a basic level. If you do not have such skills or inclinations, then you can not even dream of creating your own mod. Many gamers see the creation of mods as an exciting and fun process that will allow them to improve the game without much effort, which developers have worked on for several years. In fact, this is a difficult and painstaking work, so it is not enough to desire and desire to learn how to make a mod for Minecraft. You need actual knowledge and skills to begin work on your own modification. If you have them, then you can proceed to the next step.
Creating Mods Using the API

So, it's time to consider specifically how to make a mod in Minecraft. Without mods, the game does not look dull or boring, but everyone wants to bring something of their own to their favorite project. And this is easiest to do using special APIs. What it is? An API is a set of programming tools that makes it easier to work in a specific environment. There are several different APIs for Minecraft, such as Forge or Sponge. With their help, you can quickly and efficiently create mods, as there will be a lot of tools in the toolbox itself, otherwise you would have to do it yourself with difficulty. Accordingly, this approach has solid advantages, among which the main ones can be distinguished, such as simplicity and efficiency, convenience, as well as compatibility with other versions of the game (and not only with the one for which the mod was developed), and even with other modifications . The only negative is the presence of an installed API for each player who wants to use your mod. However, this is not the only way that is available to you.
API-free development

This process is much more complicated than creating mods using the API. In this case, you do not use any toolkits, but work directly with the source code of the game. Accordingly, you need to have much deeper knowledge in the field of programming, as well as have a detailed idea of \u200b\u200ball aspects of the game that you will edit. The advantages in this case are obvious: you do not need to install anything to create or run mods, and you also get complete freedom of action. However, there are also many disadvantages, because your mods, for example, will not be compatible with other modifications, and they will not work on versions of Minecraft other than the one for which you wrote them. And, of course, the most important minus is the high complexity of the work. But if you are good at programming, and it is an important part of your life, then these difficulties will not be new to you.
What to choose?
Naturally, it is recommended to use the Forge API, since this is the most common set of tools that is compatible with almost everything on the Minecraft network. To make the fans of the game more understandable, you can make out an example. How to make a portal in Minecraft without mods? You need to collect the necessary resources for a long time, combine them in the correct order, follow the sequence of actions, and so on. And with the mods? Simply select it and install it. The advantages of the API in this case are obvious.